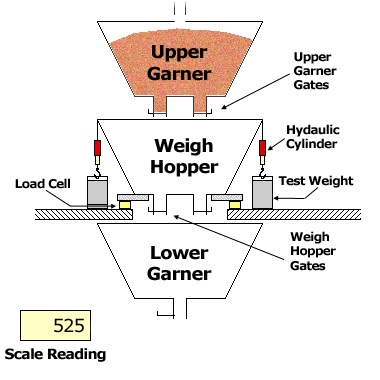
An official bulk-weighing scale is calibrated using precision test weights, which together must weigh at least 1/10 of the scale's capacity. Larger weights make the tests of the scale go faster. These weights are connected to the weigh hopper by cables, but the cables are normally slack, so their weight is supported entirely by the floor. During a scale test, hydraulic cylinders attached to the cables lift the test weights off the floor, so their weight is supported by the load cells. The difference between the scale reading with the weights lifted and the scale reading with the weights lowered should be equal to the mass of the test weights. If it is not, the scale's error over the weight range just tested is found by subtracting the mass of the test weights from this difference.
Ideally, after the test weights have been lifted and the weight has been recorded, more precision test weights would be added and the scale's accuracy would be tested at a higher weight. This process would be repeated until the scale's capacity is reached. However, no elevator has enough test weights to allow a test to be performed this way. Instead, the scale is tested by a "Build-Up Test": Starting with the weigh hopper empty, the scale is read, the test weights are lifted, and the scale is read again. Then the weights are set down, grain is added to the scale until the scale reads almost the same as it did with the weights lifted, but slightly less, and the weights are lifted again. This cycle is repeated, each time adding a mass of grain slightly less than the mass of the test weights, until the scale has been tested to capacity. The amount of grain added each time must be less than the mass of the test weights, so the weight ranges over which the scale is tested will overlap.
For each lift of the test weights, the scale's error is calculated by subtracting the weight of the test weights from the increase in the scale reading when the weights are lifted. The absolute value of this error must be less than a certain tolerance, or the scale must be adjusted. If the scale cannot be adjusted to bring the error for every lift within tolerance, the scale is removed from service until it can be repaired. For a new scale, an "Acceptance Tolerance" equal to 0.05% of the total test weight is used. For scales which have been in service for at least three months, a "Maintenance Tolerance" of 0.1% of the total test weight is used.
The "Accumulated Error" is the algebraic sum of the errors determined for the individual lifts of the test weights. It must be within an Acceptance Tolerance of 0.05% of the scale capacity or a Maintenance Tolerance of 0.1% of the scale capacity, plus half of a scale division. Because the weight ranges covered by the individual lifts overlap, it is possible for a scale to be (barely) within tolerance on each lift and still be out of tolerance on the Accumulated Error.
A demonstration of a build-up test follows. The scale has a capacity of 40,000 pounds and has 8,000 pounds of test weights. Clicking on the button below will either lift the weights or lower the weights and add grain. At the same time, it will record the scale reading in the table and calculate the error. The scale has a digital weight display with five-pound increments. Occasionally the display will flash between two values, in which case the recorded weight will be the average of the two values. This particular scale is within the maintenance tolerance.


